| |
 |
| | 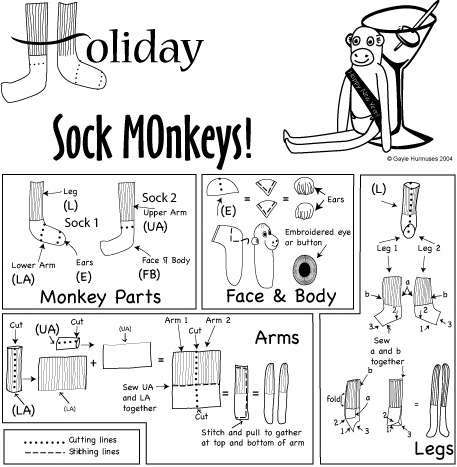 | Instructions:
1) Cut Sock 1 into 3 pieces and Sock 2 in two as shown on the diagram.
Body and Face:
2) Take piece FB and stitch a double-line around the heel as shown, cutting the thre so there is at least 3” excess on each end.
After stuffing body with fiberfill, pull the thre for the stitches tight to help create the face. Push extra stuffing into the face as you
pull the thre.
3) Work a line of gathering stitches along the edge of the top of the body and pull tight, stitching to securely close the he.
4) Make eyes by either sewing on a button (not recommended for very small children) or by using satin stitch to embroider them.
5) Cut Piece E in two down the centre of the toe. Work a line of gathering stitches along the edge of each piece and pull to gather.
Tighten and secure the stitches before sewing ears onto the he.
Arms:
6) Cut pieces LA and UA as shown, sew them together, then cut again along the length of the arm.
7) Fold both arm pieces and after sewing along the bottom and side, stuff the arm and sew shut.
8) Sew the arms to the body just under the line of the bottom of the face.
Legs:
9) Cut piece L in two by cutting along the front and back of the stem as shown.
10) Fold Leg 1 lengthwise and sew from the top down to the heel. It is helpful to do this part by hand. When you reach the bottom of
the leg you will be left with a triangle.
11) Fold the triangle so that Edges 1-2 (previously one long edge) are matched and sew them together. When you get to the
end of the seam of Edge 1, continue the line of stitches along edges 2-3 to the end.
12) Stuff leg and sew the open end shut. Do the same with Leg 2.
13) Sew legs to body | |
| |
|
|
|
|
|
|
| |
|